Create An Active Skin
(Irregularly Shaped Form Based on any Image)
Yes, believe it or not, the images shown below are both Visual Basic forms. Each
picture illustrates a single form. Why use a form like this? Because they
are eye catching. Forms looking like this are called Skins
and are actually very popular. Customizable Skins are used in popular
applications such as RealPlayer and
Winamp.
This sample shows how to create a skin resembling any
image. I call it an Active skin because
you can change it by simply dragging a new image onto it. Likewise, you
can add and remove skin shaped buttons with a simple drag operation.

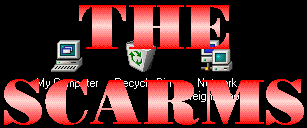
TheScarms is one form displayed on my PC's black desktop.

Here I used the GIF image from my banner. The form was dragged over a white
background.
Download Source Code
A Skin is an Irregularly
shaped form. Forms that have shapes that do not resemble the standard
rectangular shape are known as Irregular forms.
Irregular forms may be round, elliptical, have holes in them or may be shaped
like an n-sided polygon. You can see more examples of irregular forms on
my Irregular Forms page.
The skin is created by scanning an image from top
to bottom and left to right a pixel at a time. The program assumes that
the top left most pixel represents the image's background color.
As it scans across a row, it skips pixels matching the background color.
When a different color pixel is encountered, the location is stored. The
scan continues across the row until either the right side of the image is
reached or a background colored pixel is found.
We now know the width of a portion of the foreground image. Since we are
scanning a row at a time, the height is one pixel. Using these
dimensions, a Region is created with the
CreateRectRgn API. A window Region
is the area within the window (a form or control) where the operating system
permits drawing. The operating system does not display any portion of a
window that lies outside of this region.
The scan continues until the end of the row. Then next row is scanned and
the process continues until it reaches the bottom of the image. Each time
a section of the foreground image is located a new region
is created and combined, by a call to CombineRgn,
with the existing region. Once our final
region is defined, the SetWindowRgn API
tells Windows how to draw the form. Drawing the skin shaped buttons is
done in a similar fashion.
Since the skin has no caption we need a way to move it. A call to the
ReleaseCapture and SendMessage API's in
the form's MouseDown event accomplishes this. To move the skin, just click
on it and drag it to a new location.
To add buttons, right click on the skin to display the options menu and select
the appropriate option. Then you can add a button by dragging it onto the
skin from the Images form. When you begin dragging the button its
OLEStartDrag event triggers. I use this event to pass the type
of button being dragged and resource file identifier of the image to the main
form. When the button is dropped on the skin the main form's
OleDragDrop event fires. Here, I make an existing picturebox
visible and load the proper image into it.
Like most active skins I know up front what buttons the user can add at
runtime. This allows me to write the code for the button and store it in
an existing picturebox control at design time.
If you want, you can get fancy and add controls dynamically at run time. I
have a few pages that show you how to do this and respond to the events raised
by the new controls. The problem is you will need to add the code to be
run by those controls at run time as well. Again, I have a solution for
this using the Script Control.
The image use to create the skin must be of decent quality. If it is
spotty the resultant skin will be so as well. Also, the larger the image
the longer it will take to load the skin and for Windows to repaint the desktop
when you move it.
Download the source and run it.
-
Right click the skin to display a popup menu.
-
Select Change Skin to display the Images screen. Drag a new skin
onto the existing skin.
-
Pick Select Your Own Skin to display an Open dialog. Navigate to
your own image and
open it.
-
Select Add Help Button. Drag a Help button image onto the existing
skin.
-
Select Add Quit Button. Drag a Quit button image onto the existing
skin.
-
Once you have added a button, click it to see what it does.
-
To Close the application, select Exit from the menu, double click on the
skin or click the Quit
button.
-
To Move a button, use the right mouse button to drag it to a new location.
-
To Delete a button, hold down the Shift key and right click the button.
|