Add Your Application's Icon to the System Tray
You can add your application's icon to the system tray, the small area on the
right side of the task bar, and react to mouse events occurring on your system
tray icon. In this sample I display a message but you can just as easily popup
a menu.
I also show you how to create an instance of an ActiveX object and call one of
its methods when the user right clicks on the icon in the system tray. Normally
it is not possible to instantiate objects from the tray due to the way Windows
handles Remote Procedure Calls. However, you can
do it by executing your object code from a timer event.

Download Source Code
| Add you App's Icon to the System Tray and Respond to Mouse Events
|
The Shell_NotifyIcon API function sends a message
to the system to add, modify, or delete an icon from the taskbar status area
and is the basis of this program.
When you click the Add button, a NOTIFYICONDATA structure
is populated. This structure contains the information needed to place your icon
in the system tray. Its hWnd element gets assigned the handle of your
form that will receive the notification messages when a mouse event occurs to
the system tray icon. Its uID element should be set to your form's icon
property and its hIcon value to the handle of the icon to add, delete or
modify. The uCallbackMessage element should be set to the system message
that will be sent to the form specified by hWnd whenever a mouse event
occurs to the tray icon. Typically the WM_MOUSEMOVE
message is specified.
You can have a tool tip message display when the mouse hovers over the tray
icon. To do this you need to add the text to the szTip element. Once
these values are set, the uFlags item needs to be set to
NIF_ICON Or NIF_MESSAGE Or
NIF_TIP to indicate that all values contain valid data.
A call to Shell_NotifyIcon passing the
NotifyIconData strucutre and the NIM_ADD
flag adds your icon to the system tray. Now, whenever a mouse action occurs
over the icon, your form's MouseMove event will
fire and its X parameter will receive a value from the system. By decoding this
value, you can tell what the mouse action was. For example, left button up,
right button up, left button double clicked,.... In this sample, on a left
button up action I display a message.
Before your application terminates it should remove the icon from the tray.
Again just call Shell_NotifyIcon passing it the
same NotifyIconData. This time, however, send the
NIM_DELETE message.
| Working With an ActiveX Object
|
When your form's MouseMove procedure triggers due to a mouse event on your
system tray icon you can execute any code that you would normally call from
MouseMove -- almost. If you need to call CreateObject
to create a new instance of an ActiveX component
or read a property or execute a method from an existing component, you will get
an error message. This is due to the way Windows handles Remote Procedure Calls
from the status area.
What you need to do is enable a timer from the MouseMove procedure. The timer's
interval should be set to a low value so it fires immediately. Place your code
to instantiated or work with the ActiveX component in the timer event and when
the timer goes off your code will run without any RPC errors. Remember to
disable the timer as soon as it fires.
The SystemTray project issues a CreateObject
to create an instance of the Sample component I have included. Sample
is a very basic out of process ActiveX component containing a single class and
a single method. All it does is display a messagebox. But the idea is to
illustrate how to call it from the system tray.
Download the code. Run the Sample.vbp project by pressing Ctrl-F5 or compile it
to create Sample.exe. Without this code running or the .Exe available, an error
will occur when you right click on the icon in the system tray.
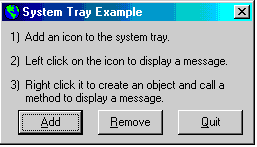
Now run the SystemTray project. Click the Add button to place the Globe
icon in the system tray. Left click on the Globe to display a message. Right
click the Globe to display a message from the Sample ActiveX code component.
|