Create a Transparent Bitmap using BitBlt API
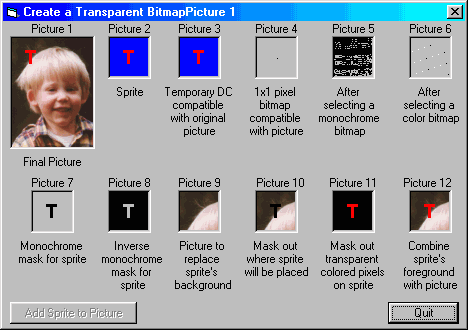
This example shows how to create a transparent bitmap. It starts with a
bitmap of my son and one of a red "T" on a blue background. The "T" is
superimposed over my son allowing his picture to show through its blue
background. Each step along the way is show. The key to this is a
number of GDI functions, most importantly, the BitBlt
(Bit-Block Transfer) API.

Download Source Code
First, we need to display the bitmaps and get a handle to the "T". Two
variables are Dimmed as StdPicture. The
StdPicture object lets you keep an image in memory without having a
picturebox or image control on a form. It also provides a handle property
which is what we need. The bitmaps are stored in the StdPicture
objects using LoadPicture and then assigned to the
picture property of the picturebox controls.
Most GDI (Graphic Device Interface) functions work with Device
Contexts. A device context (DC) is a structure that defines a set of
graphic objects and their attributes, and the graphic modes that affect
output. Also, the DC refers to a physical output device — its name,
device driver, and other attributes. GDI function parameters contain a
handle to a DC to include the attributes of the specified device. There
are four types of DC: display (supports drawing operations on a video display
terminal), printer (supports drawing operations on a printer or plotter),
memory (supports drawing operations on a bitmap), and information (supports
retrieval of device data.) We are interested in memory DCs here.
From here on, I will refer to bitmap of my son as the bitmap and the
image of the "T" as a sprite.
What we need to do is: mask out the background of the sprite, mask out the
portion of the bitmap where the "T" will be placed, and merge the two
images together.
The first step is to create a temporary Device Context compatible with the
destination picturebox's DC using the CreateCompatibleDC
function. CreateCompatibleDC creates a one
monochrome pixel by one monochrome pixel memory DC. Before using this DC
we must select the sprite into it with a call to SelectObject.
At this point, we have a copy of the sprite in memory (see picture 3). A
call to GetObject, passing the handle of the
sprite, writes the sprite's dimensions to a Bitmap
structure. This information is needed throughout.
To create the above mentioned masks, we need some temporary DCs to work
with. Four calls to CreateCompatibleDC are
made (picture 4 shows the output of this step). Before a DC can be used
we must select a bitmap into it meaning we must create four bitmaps. We
will need two monochrome and two color bitmaps. The monochrome bitmaps
are created with the CreateBitmap API passing in
the bitmap's dimensions, a 1 for the color depth and a 1 for the number of bits
to use to identify a color. In a monochrome bitmap, zeros represent the
foreground color and ones the background color.
The two color bitmaps are created by calling the CreateCompatibleBitmap
function passing in the desired dimensions and the handle to the DC for
the bitmap of my son. The result is two, one pixel by one pixel color
bitmaps. Using SelectObject, these bitmaps
are copied into the memory device contexts. Pictures 5 and 6 show the
results.
Everything is now in place to begin the real work. The mapping mode, which
defines the unit of measure applied to the sprite, is set to that of the
destination picturebox via the GetMapMode and
SetMapMode functions. The blue background of the sprite is the
color we want to be transparent. Therefore, we need to set the background
of the sprite's DC to blue. This is accomplished via the
SetBkColor API specifying the DC to change and the color to change
to.
We need to create two masks for the sprite using the monochrome bitmaps.
Recall, in a monochrome bitmap, ones represent the background color (blue) and
zeros the foreground color (i.e. the red "T"). In one mask, ones will
represent the "T" and in the other, the background. To create a mask
representing the background, the BitBlt (Bit-Block
Transfer) function is employed to copy the colored sprite to a monochrome
bitmap. Using the vbSrcCopy option instructs
BitBlt to do a straight copy of the color data from one device
context to another. To create the mask representing the "T", the first
mask is inverted. This is done by BitBlt-ing
the first mask to the second monochrome bitmap specifying the
vbNotSrcCopy option. See pictures 7 and 8.
Almost done! The original bitmap is BitBlt to
a color memory DC with the vbSrcCopy flag (picture
9). Next, its bits where the "T" is to be located are masked out by AND-ing
in the mask with the zeros where the "T" is (picture 10). The background
of the sprite is masked out using BitBlt and the
mask with the zeros for the background (picture 11).
We are now left with two DCs: a color one of the bitmap with the "T" masked out
and a color one of the sprite with only the "T". To produce the
final image, these two DCs are combined by OR-ing their data together
via a call to BitBlt with the vbSrcPaint
flag (picture 12). All that remains is to delete the memory device
contexts and clean up.
Download this project and copy the 2 bitmaps to the proper folder.
The images used by this program are expected to be in App.Path. That means
if you compile this program it should work fine. However, if you step
through the code, App.Path will point to the folder where VB is
installed. Copy the bitmaps to the correct folder before running.
Also, when stepping through the code, make sure that the form is no obscured by
any other windows in order for it to paint properly.
|