Share Data Between Apps Without COM
Here's an easy way to share data between 2 VB applications.
Since each app runs in its own process space, a variable in one application is
not meaningful to another application in a different process space.
Typically you pass data between apps by turning one of them into an ActiveX
server to create a client/server relationship using COM to handle the
inter-process communication. Your client application sets or reads a property
in the server application and you pass the data that way.
Here is a faster, simpler approach using the SendMessage
API function. I will demonstrate a few variations of this technique: passing
strings then a larger amount of data. Unlike COM, however, this approach will
not work cross machines.
 
Download Source Code
Application A communicates with application B by sending a message to a window
in application B. The message carries with it the desired data. This sample
consists of 2 programs. As their names imply, SendData and ReceiveData
send and receive data respectively.
Application B needs to know when the message arrives and then needs to process
it. Application A may want to have application B process the data either
synchronously or asynchronously.
Sending a string to application B is easy. Remember, the form and everything on
it, such as a textbox, are windows. A textbox is ideal for receiving a string
since its Change Event will automatically fire
when a WM_SETTEXT message is received. This event
can contain whatever logic is necessary to process the string. My sample
application simply displays a message box.
The problem with sending data to a textbox is that there is no good way to
distinguish among multiple textboxes on the same window. So, I load an
additional form containing a single textbox. This form is invisible since it is
Loaded but not shown and its Visible and
ShowInTaskBar properties are set false.
This solves another issue as well. The easiest way to find the window containing
the textbox is by looking at its caption. If two applications have windows with
similar captions we may not find the correct window. Using an invisible form
lets you set its caption to one that is unlikely to be duplicated in another
program.
I call the FindWindow API function with the caption
of the target window in the ReceiveData application. FindWindow
returns the handle of the window containing the textbox. Now we need the
textbox's handle. FindWindowEx can be used to find
child windows. I pass it the window's handle and since the window only has a
single child, the textbox, FindWindowEx returns
the desired handle.
Next I call SendMessage to pass a string from
Application A to the textbox in Application B. SendMessage
takes as parameters the handle of the textbox, the WM_SETTEXT
message and the string to pass.
When the textbox receives the message its Change event uses a message box to
display it. The SendMessage call waits until the
message box is dismissed before processing in Application A continues. To allow
Application B to process the data asynchronously and have Application A
continue to respond, you have 2 options. First, you can use the
SendMessageTimeout function. With this call you can set the time
interval after which the API will return. Or, you can call the
ReplyMessage API in the textbox's change event. This API returns a
value to the SendMessage call telling it to return
and continue processing.
Sending larger amounts of data is harder because we need to use the
WM_COPYDATA message. This message lets you use Memory
Mapped files to communicate between applications. This is what COM
does. Problem is, the target window does not automatically respond to this
message. Subclassing the window is required to trap the message.
To pass string data from one Visual Basic application to another, the Unicode
string must be converted to ASCII before you pass it. The receiving application
must then convert the ASCII string back to Unicode.
Using the CopyMemory API, the string is converted
to an ASCII byte array. We now need to populate a CopyDataStruct
structure to pass the data. The trick here is that the lpData element of
CopyDataStruct must be a pointer to the data to pass. To do
this we must use Visual Basic’s undocumented VarPtr
function which yields the address of variables and user-defined types
(similarly StrPtr returns the address of a
string and ObjPtr the address of an
object).
Lastly, the SendMessage function sends the
WM_COPYDATA message along with our CopyDataStruct
structure.
To receive the string data the ReceiveData application must hook into Window’s
message stream to catch the WM_COPYDATA message.
This is accomplished by using the SetWindowLong API
with the GWL_WNDPROC flag to replace the original
procedure called whenever the form receives a message with our own fWindowProc
callback procedure.
When a message is received the fWindowProc function is invoked. If it is
the copy message, a call is made to the pReceiveMsg procedure. In any
case, the CallWindowProc API is called to pass the
message to original window procedure.
PReceiveMsg uses the CopyMemory API to copy
the CopyDataStruct sent to this application to a
local structure. A second call to CopyMemory copies
the string pointed to by the lpData element of CopyDataStruct
into a byte array. The string is converted back to Unicode and then
displayed.
Other types of data can be handled similarly. This sample can also pass an array
of strings and an array of doubles. For simplicity sake, the array of strings
is first stored in a PropertyBag to facilitate
converting it to a byte array.
The PropertyBag object allows you to accept a
series of values and store them as a stream of bytes. It lets you store a
key/value pair and use the key to extract the value, similar to a
Collection. This is where the similarities stop, however.
The PropertyBag object is really a stream of key/value pairs. Writing to the
propertybag appends to the end of the stream without deleting anything.
Reading from it reads in a round robin fashion. For example:
   Dim pb As New PropertyBag
   pb.WriteProperty "Dept", "Sales"
   pb.WriteProperty "Name", "Dave"
   pb.WriteProperty "Name", "Susan"
   pb.WriteProperty "Name", "Jordan"
   pb.ReadProperty("Name") 'Dave
   pb.ReadProperty("Name") 'Susan
   pb.ReadProperty("Name") 'Jordan
   pb.ReadProperty("Name") 'Dave Again!
You can easily persist the PropertyBag's contents to a file:
   Dim pb As New PropertyBag
   Dim varIn As Variant
   Dim varOut As Variant

   pb.WriteProperty "Title", "Developer"
   pb.WriteProperty "Name", "Dave"
   pb.WriteProperty "WebSite", "www.thescarms.com"
   varOut = pb.Contents
   Open "c:\temp\data.dat" For Binary As #1
   Put #1, , varOut
   Close #1
   Open "c:\temp\data.dat" For Binary As #1
   Get #1, , varIn
   Close #1
   pb.Contents = varIn
   Debug.Print pb.ReadProperty("Title")   'Developer
   Debug.Print pb.ReadProperty("Name")    'Dave
   Debug.Print pb.ReadProperty("WebSite") 'www.thescarms.com
The standard PropertyBag does not let you display a count of its items or
enumerate through them. The above download contains a class module that extends
the standard PropertyBag by adding these features.
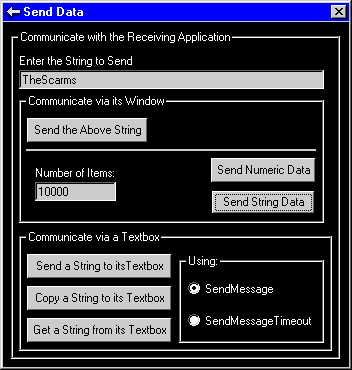
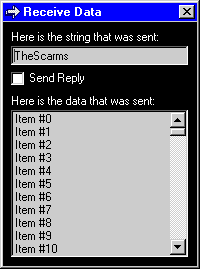
Start both sample applications.
-
Enter a string into the textbox of the SendData application. Click the "Send
the Above String" button. The text appears in the ReceiveData application.
-
Clear the textbox in SendData. Click the "Get a String from its Textbox"
button. The text appears in the SendData application.
-
Enter a new string into the textbox of SendData. This is important. If you send
the same text again, the textbox's Change event will not fire since the text
hasn't changed. Select the "SendMessage" option. Click the "Send a String to
its Textbox" button. The Change event for the textbox on the hidden window in
the Receive Data application fires and displays a message box.
Note that the SendData application does not respond until you dismiss the
message box.
-
Enter a new string into the textbox of SendData. Select "SendMessageTimeout".
Click the "Send a String to its Textbox" button. Again the Receive Data
application displays a message box.
This time, however, the SendData application does respond without dismissing
the message box because the SendMessage call timed out.
-
Change the text in SendData again. Now check the "Send Reply" box on "Receive
Data" and select "SendMessage". Click the "Send a String to its Textbox"
button. Again the Receive Data application displays a message box.
Now, event though you used the synchronous SendMessage command, the SendData
application will respond without dismissing the message box.
-
Sending text clears the textbox. Copying text appends to the existing contents.
Click the "Copy a String to its Textbox" button to try it.
-
In the SendData application, enter the number items to send. Click the "Send
Numeric Data" button to populate the listbox.
-
Click the "Send String Data" button to populate the listbox.
|